3 Alternatives For Investing For Your Child’s Higher Education Costs

With higher education tuition increasing at double digit year over year percentages an effective saving plan for your kid’s education is becoming much more important than it has been before. Most families will discover that their future higher education costs will be much more than they have saved for their kid’s education. This leaves many kids to be faced with obtaining financial aid to pay for a portion of their college education. The goal of this article is to explore the pros and cons of 4 common investment options when saving for college. This article will also explore why some of these options are better than other when considering a portion of your kid’s education may be funded by financial aid.

529 College Savings Plan: –

A 529 college savings plan is a fairly new investment option for college saving. It allows just about anyone to save for college. There is a long list of benefits of a 529 college savings plan, but perhaps the most important are that your earnings grow tax-free if you use it for qualified education expenses. Additionally, the maximum amount you can contribute to a 529 plan can go as high as several hundred thousand dollars depending on your State. In the event you do not use the funds for college, you can still withdrawal your earnings, but you will have to pay taxes and a 10% penalty. The penalty will be waived if your child receives a scholarship, or your child becomes disable or dies.

529 collage .jpg
529 plans can typically be purchased through a broker or mutual fund company, but a disadvantage is that investment choices can sometimes be limited. Since qualifying for financial aid is based on a calculation that considers your kids assets, another big benefit of a 529 college savings plan is that the money in the plan is classified as a parents assets so less that 6% of the value counts against your kid’s financial aid eligibility.

Uniform Gifts to Minors Act/Uniform Transfers to Minors Act(UGMA/UTA Custodial Account): –

college-financing.jpg
The benefit of a UMGA/UTA Custodial Account is that there is no limit on the contribution and it is easy to set up at most financial institutions. However, the limitations far outweigh the benefits. The first limitation of a UMGA/UTA Custodial Account is that these types of accounts offer a very little tax advantage. If your child is under 14, only the first $800 of income is tax-free, the next $800 is taxed at your child’s tax rate and after that, there is no tax benefit at all. The other big limitation is that the account has to be set up in your child’s name. As a result, if your child needs financial aid all of the assets will be reviewed at a 35% rate. Therefore, this type of account is not advisable for those who may need financial aid.

Coverdell Education Savings Account (CESA): –

ESA.jpg

A Coverdell Education Savings Account is very similar to a 529 college savings plan. The main difference is that with a Coverdell Education Savings Account you can only contribute $2000 per child and to qualify your adjusted gross income must be less than $110,000 if single and less than $220,000 if married filing jointly. The account is classified as a parent’s asset so less that 6% of the value counts against your kid’s financial aid eligibility.

For more information about Education related article, Click here

7 Effective Tips For Get a New Job FAST

In this final article, we giving you 7 quality tips which will help you cut valuable time off each step and therefore the entire job hunt process.

1. Don’t wait till you start looking for a job before you start looking. 

Be up to date with your industry and the conditions of your employment environment all the time. Make this part of your job description in every job you hold. It could save you weeks when it comes time to find a job.

2. Keep your resume up to date

Resume-620x412.jpg
Find a template or layout that you are comfortable with and maintain it. Update it twice a year at least. It will save you the mad scramble to put it together and possibly a lost opportunity because you were unprepared.

3. Network

Keep in touch with all your contacts in the industry. This includes workmates, employers, contacts at employment agencies, contacts in similar companies etc. You never know what other people will be doing tomorrow, or what opportunities they may have for you.

4. Accept interviews even if you are not interested in the
opportunity, or not looking for a job.

interview
Interviewing is a very specific skill. Keep that skill honed. Keep practicing the skill. You don’t want to lose “perfect” opportunities because it is your first interview in 5 years and you need to get your answers back up to scratch. Remember you do not have to accept the job.

5. Keep a diary of your experiences. 

diary.jpg
Note what you did well with each job opportunity. What worked, what didn’t, improvements you could make, elements you can get rid of. Then, when you next go through an employment opportunity situation, revisit your notes, duplicate the good things and improve the bad things. Recognize the process as having a learning curve, and learn.

6. If you do not have a job and need one, make job hunting
your full-time job.

job hunting.jpg
Get out of bed at the same time you would if you were working in your given field. This will put your time clock in sync with your interviewers. Spend the same hours working on your job hunt as you would in the job. Be disciplined.

7. Keep focused

staying-focused-on-goals.jpg
Know what you are looking for and have a clear plan for achieving your goal. Do not accept roles that are different to your goals at the start of your job hunt. This could cost
your years of your career.
For more information about Education related article, Click here

10 Power Tips for Presentations with Computer Projection

When was the last time you sat through a terrible presentation using computer projection? When was the last time you gave one? If you want to avoid disaster and give your career a boost then apply these ten tips the next time you present with the computer projector. And if you want to do a friend a favor then slide them a copy of these tips before their next presentation.

The biggest mistake is to believe that cool graphics will make up for your lack of presentation skills. If you can not cook – it does not matter how good the stove is. Use these tips to develop your presentation skills and work with the tools. A computer is only a tool. You are the presenter. When you present with multi-media you are more than a performer. You are a producer. Be aware and stay in control of what you and your technology are doing to the audience.

1. Stand on the left side as the audience sees you. Because we read from left to right your audience can look at you then follow your gesture to the screen. Their eyes are comfortably moving left to right, they read the text then they return to you. If you stood on the right side their eyes have to make too many movements to read the slides and watch you. If you present using Hebrew, (read right to left), stand on the right side of the screen. If you present using old Chinese, (top to bottom), climb on top of the screen, (just kidding).

presentation-300x300.jpg

2. You are the show. Be heard and be seen. Stand away from the computer and in the light. Use a remote mouse to get away from the computer. Too many people hide in the dark behind the laptop. Arrange the lighting in the room so that you are in the light while the screen is dark. You might need to unscrew some of the ceiling lights to get it right.

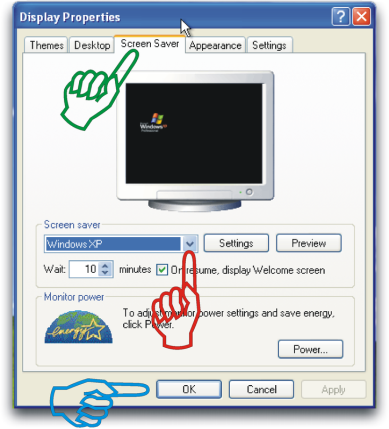
3. Turn off the screen savers on your computer – any that are part of the Windows software – plus the one that comes with the laptop. It is embarrassing for you to be talking about important points you thought were on the screen while they are looking at flying toasters or Bart Simpson. It is even worse when your energy saver kicks in and shuts it all down. Remember to adjust this as well.

xpproperties2.png

4. Learn how to use the switch that toggles both screens on. Often this is a function key. This toggle controls whether your laptop or projector – or both are on. You want both on so you can look at the laptop while the audience watches the same image behind you on the screen. Occasionally glance quickly at the screen just to check. But put your laptop between you and the audience so you can be looking at your audience while speaking.

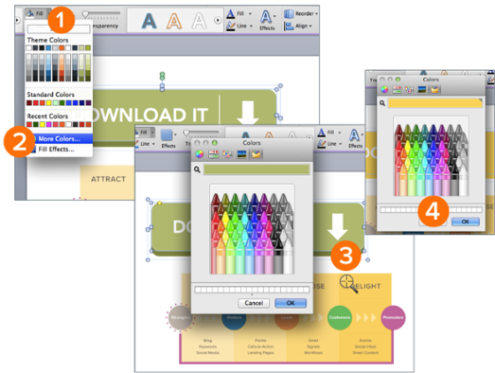
5. Colors appear differently on the projector, the laptop, and the desktop where you designed it. If the exact color is important, (perhaps for a company logo), test and adjust the color ahead of time.

blog-add-colors-cta-2.png

6. Keep it simple with the colors and special effects. Use no more than six colors on a slide. Use slide transitions and builds to entertain without detracting from your message. Effects like partial build reveal one point at a time allowing your audience to stay right with you.

7. Motion attracts their eyes. Gesture to the screen when you want them to look there. Use moving text to grab attention. Stand still when you want them to look at the screen. Move when you want to capture their attention again.

8. Test your slides for size and readability by standing six feet away from the monitor. If you can read the monitor then your audience will likely be able to read the screen. If they can not comfortably see and read your screen all you did was to annoy them.

9. Arrive early and test everything. Re-read this line – again!

10. Murphy loves technology. Be prepared with backup files, an extra power source for the laptop and projector and spare batteries for your remote mouse. It only takes one little thing to spoil it. Be prepared to give your presentation without the hardware.

For more information about Education related article, Click here